 Engineer Sushil Kumar Sushil Kumar Profile
First of all, what is declarative schema in Magento 2? It is a new way of working with database without developers having to write various scripts for each new module version. It was introduced in 2018 with Magento 2.3 and it’s one of the major changes. In this article you will learn how to use declarative schema and apply data patches.
Why declarative schema?
What are the advantages of using declarative schema? In short, before it, we had to write database scripts in PHP which is not a perfect solution. That’s because when you upgrade Magento to a version several releases ahead of the installed version, all the upgrade scripts between those two versions will still be executed. In other words, this creates unnecessarily complex situations. The new approach allows us to declare the final state of the database and the system automatically adjusts to it. Furthermore, when you uninstall the module, data will be deleted.
Declarative Schema Configuration
Let’s say you have a module with version 1.0.0 and the latest version is 1.0.3. When you upgrade it, script changes for 1.0.1 and 1.0.2 will also be applied. This is less than ideal because Magento applies changes blindly. What that means is that in one version you might introduce a column and then delete it in the very next. That’s one of the problems declarative schema eliminates. Using it, Magento determines the differences between the current table structure and what it should look like.
You’ll have to create a new module before we dig into working with database.
In the Module/etc/ folder create db_schema.xml. This is the file where you will define your tables, columns, pretty much everything you need. I made a simple example with two tables to show you how to do it.
<?xml version="1.0"?>
<schema xmlns:xsi="http://www.w3.org/2001/XMLSchema-instance"
 xsi:noNamespaceSchemaLocation="urn:magento:framework:Setup/Declaration/Schema/etc/schema.xsd"> <table name="inchoo_declarative_schema1" resource="default" engine="innodb" comment="Inchoo Table 1"> <column xsi:type="int" name="table_1_id" padding="10" unsigned="true" nullable="false" identity="true" comment="ID"/> <column xsi:type="varchar" name="name" comment="Name"/> <constraint xsi:type="primary" referenceId="PRIMARY"> <column name="table_1_id"/> </constraint> </table> <table name="inchoo_declarative_schema2" resource="default" engine="innodb" comment="Inchoo Table 2"> <column xsi:type="int" name="table_2_id" padding="10" unsigned="true" nullable="false" identity="true" comment="ID"/> <column xsi:type="text" name="content" comment="Content"/> <constraint xsi:type="primary" referenceId="PRIMARY"> <column name="table_2_id"/> </constraint> </table>
</schema>
Running setup:upgrade will create two tables, inchoo_declarative_schema1 and inchoo_declarative_schema2 with IDs and an additional column. As you can see, the ID columns are set as primary key.
Tables
The table node can contain three different types of subnodes:
- column
- constraint
- index
Column
Column is used to define a column in the table. Its “xsi:type” defines its type (boolean, date, int…). There are more attributes except for those you can see in our image (such as default, precision, scale) but in this article I won’t go into details about what each of them does.
Constraint
Constraint always contains the “type” and “referenceId” attributes. Type can be primary, unique or foreign. ReferenceId is a custom identifier we use for relation mapping in the scope of db_schema.xml files. The recommended way to set the value of the referenceId attribute is to use the value from db_schema_whitelist.json. For an explanation on how to generate whitelist, continue reading.
Index
We use the index subnode for speeding up DQL operations and it contains two attributes, “referenceId” and “indexType”. We already explained what referenceId is and how to get its value. The value of indexType must be btree, fulltext or hash.
In case you ran setup upgrade and then remembered you forgot a column or anything, don’t worry, you don’t need any additional files! You can just add anything you missed inside the same db_schema.xml and on the next setup upgrade your database will be updated.
The same goes for table or column deletion. Simply delete the table or column from db_schema.xml and run setup upgrade. However, if you want to drop a column declared in another module, you should redeclare it with the “disabled=true” attribute. It’s also important to know that you can only drop a column if it exists in the db_schema_whitelist.json file.
Table and column renaming is supported and here’s how to do it. All you have to do is change the “name” attribute on the table declaration and add the “onCreate” attribute. In our case, the table declaration would look like this if we wanted to rename inchoo_declarative_schema1:
<table name="inchoo_declarative_schema1_renamed" onCreate="migrateDataFromAnotherTable(inchoo_declarative_schema1)"> <column xsi:type="int" name="table_1_id" padding="10" unsigned="true" nullable="false" identity="true"
 comment="ID"/> <column xsi:type="varchar" name="name" comment="Name"/> <constraint xsi:type="primary" referenceId="PRIMARY"> <column name="table_1_id"/> </constraint>
</table>
Renaming is done by actually removing the table with the old name and creating the table with the new name while keeping all your data.
Dry run
One of the best novelties with this approach is the dry run mode. With it you can examine all the DDL SQL statements generated during the installation. Your data and schemas will remain the same so this is essentially a testing tool.
You can enable dry run mode using the following commands:
bin/magento setup:install --dry-run=1or
bin/magento setup:upgrade --dry-run=1After running it, Magento creates a log at var/log/dry-run-installation.log. There you can see the generated DDL SQL statements and use them for debugging or optimizing.
I added another column to the inchoo_declarative_schema2 table and run setup upgrade with dry run mode enabled:

In the log you can see that I tried to add column ‘log_test’ but it won’t actually happen before I run setup upgrade without dry run mode. Extremely useful, isn’t it?
Whitelist
Since backward compatibility must be maintained, declarative schema doesn’t automatically delete database tables, columns or keys not defined in db_schema.xml.
This is one of the reasons we have db_schema_whitelist.json. It shows a history of all tables, columns and keys added with declarative schema and it’s required for drop operations. After running setup upgrade or install, you can generate it with the following command:
bin/magento setup:db-declaration:generate-whitelistThis will create a file inside your etc folder called db_schema_whitelist.json. For instance, our db_schema_whitelist.json will look like this:

There are options you can add at the end of that command. For instance, you can use “–module-name=YourModule” to specify the module you want to generate a whitelist for. Similarly, you could also set “–module-name=all” although it will generate a whitelist for all modules by default.
It is recommended to generate a new whitelist for each release that contains changes in the db_schema.xml.
Data patches
In this article I will only give you an overview on what data patches are and why we use them. In short, data patches are classes with data modification instructions. Patches are applied only once and a list of those applied patches can be found in the patch_list table in database. All patches that are not applied will be applied when you run setup upgrade.
You should create your data patch inside Module/Setup/Patch/Data folder. It has to implement \Magento\Framework\Setup\Patch\DataPatchInterface.
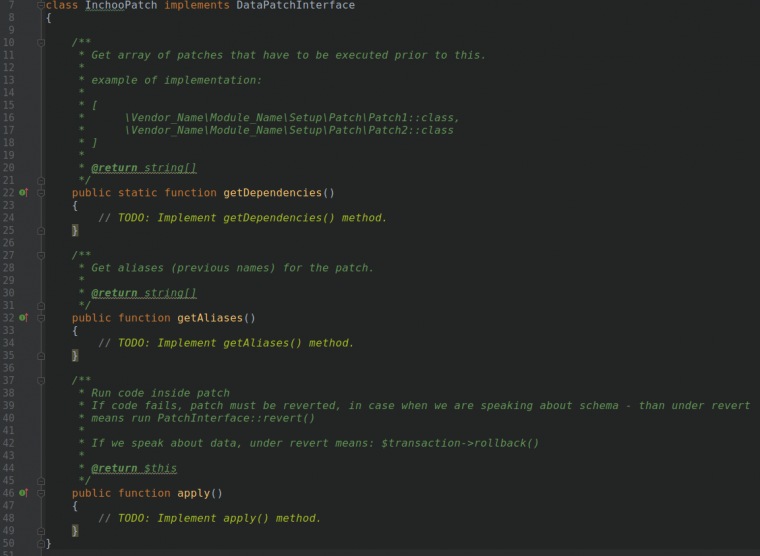
As you can see, we got 3 methods, getDependencies(), getAliases(), and apply(). Since patches can depend on other patches, you can define their dependencies in the getDependencies() method:
public static function getDependencies() { return [ Module\Setup\Patch\Data\Patch::class ];
}
The method getAliases() allows us to add patch aliases if we have to change the name of the patch.
The method you’ll be using the most is apply(). This is where your code you want to apply in the patch goes. For example, this is the apply() method in Magento\Catalog\Setup\Patch\Data\DisallowUsingHtmlForProductName class:

In conclusion, the declarative schema feature makes it easier for developers to work with the database. Furthermore, the process is faster and much simpler than it was before, which means performance will be improved.
While currently implementing declarative schema is not required for Magento 2.3, it is highly recommended you learn it as it will replace upgrade scripts in the future.
And if you want to see how we can help you with your development process, get in touch to start the conversation!
The post Declarative Schema feature in Magento 2 appeared first on Inchoo.